Building a Fire Pit Fire is essential to warmth for survival. It is also a great way to entertain. Whether you are looking to do some warming up, or making sure your fire is ready for cooking, this project should be a fairly easy one you can complete from start to finish, over the course of one weekend. If you are like me (Preppy), I’ll do the hard manual labor part on day 1, and then do the actual building of the pit on the 2nd day. I’m not built for extended hours of hard labor. LOL As always get all your supplies and materials first, so you don’t have any delays in building this super great Fire Pit! Have fun and enjoy!
Timeframes to complete this project have everything to do with making sure you have all your tools and materials first and at the ready. These are estimated timeframes: Prepper: 1 to 3 hours Preppy: 4-6 hours Skill Level: 1 out of 5 (some shovel digging & rock hauling; need muscles) Tools Required • Rubber Mallet • Shovel • Hammer • 2x4 (for scrape leveling) • Carpenter’s Level Materials Required • Weed tarp/barrier • Many bricks or paver stones • construction caulk (glue) • Pea gravel • Big flagstones • Lawn staples • Weed killer (spray) • Border tracking (optional)
Step #1: Find a suitable area in your yard where you want the fire pit to be laid down. Don’t build too close to fencing, or under any kind of tree cover. The last thing you want is to be the one on the news that night, responsible for starting a neighborhood fire. Also, since you will be doing a little digging, please dial 411 for your local inspector to come out and locate gas lines. It’s pretty obvious they don’t want any type of fire near their supply lines. Do this about 5 days before starting the project, to give them time to respond. Also, if you have propane tanks on your property, please don’t build the pit anywhere near those. Once you have found your suitable area, let’s go to step 2!
Step #2:
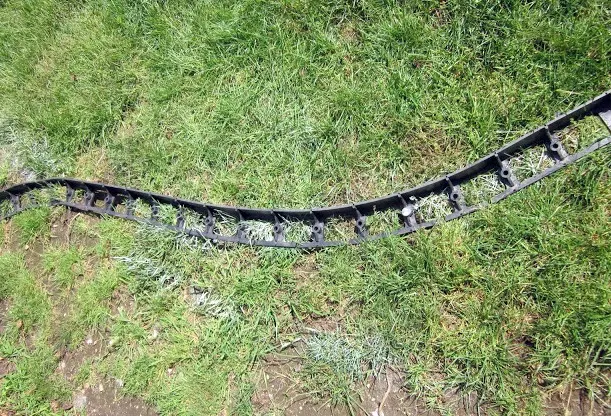
Mark off the space and lay a border. You don’t have to get super fancy with the plastic guards that are shown in this picture. You can honestly use something as simple as some spray paint to outline the area where you want to dig your fire pit. Either one is fine. If you are using the plastic guard rails because you plan a much larger area to lay patio stones, have fun with that and get creative.

Step #3:
Decide what material you want to use for your stone fire pit. Some people use bricks. Some people like a little more decorative look so they use those Nicolock Pavers. You can pretty much use whatever you like, the key here is we are looking for something that will allow a protective barrier around the fire itself. Choose something that will not burn. You can even use rudimentary, river rock if you have some on your property you had laying around. It will be very caveman rustic looking, but if it is functional and holds the fire, you win!

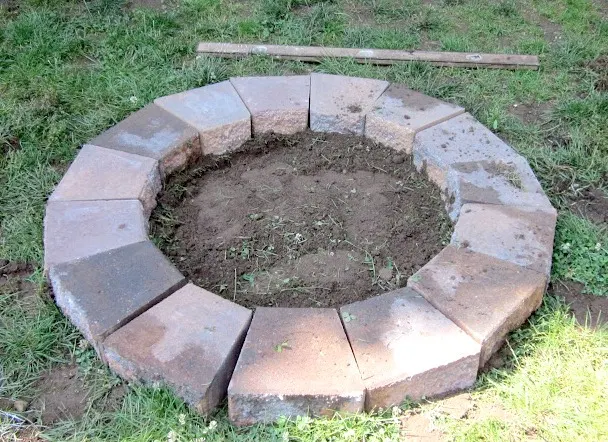
Step #4: Get Digging! Dig the grass around the area you marked off for the pit. Use a shovel and put some effort into it. This will not be easy, as grass has roots and you will have to really work at it. Work your way around the outline and remove all the grass from the middle. It doesn’t have to look pretty just yet, but will allow you to get access to the soil below with the shovel. Once you have the grass removed, now use the shovel to dig down into the soil two inches. You want two inches so your first layer of paver stones sit inside the edge you are digging and have a place to be anchored. Once you have a 2-inch depth all the way around and across the middle, you can use one of the pavers to tamp down and make the ground/dirt level across the entire circle (or rectangle) you dug out. It should start to look much nicer now. You are ready for pavers once you have this part done.
Step #5:
This part is all a matter of preference. You may want a very shallow fire pit (2-3 layers of brick/pavers). For myself, I like a fairly tall fire pit, so I will be using many pavers. I want mine 4-6 layers high, and I want a double ring, so I can sit down on it for nights where I want to be close to the warmth. Don’t forget to calculate how many pavers you will need for the bottom of the pit, if you choose to pave that as well.
Calculate the bricks/pavers: Approximately 15 pavers per layer. Mine will be 5 high. 75 pavers.
However, I want an extra ring to make the ledge of the pit wide for me to sit and warm my butt. So, I should calculate an additional 3 pavers per layer. 90 pavers.
Grand total of all pavers needed: 165 (That’s A LOT!)
Bottom: 16 pavers
Step #6:
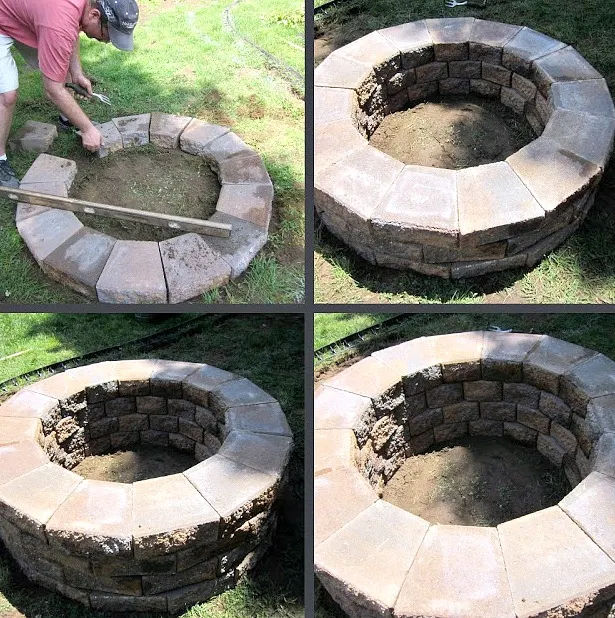
Start laying down your brick or pavers! This is the fun part and usually goes very quickly.
If you are going to have brick for the bottom of your fire pit, do those first. Tamp them down a little bit so they are firmly into the dirt. For me, since I am more of the Preppy persuasion, I will skip placing pavers for the bottom of my fire pit and opt to have an Earthen bottom. (I like less work, not more)
On layer (ring) 3 as you are laying down the brick, make sure you leave an inch of space between two bricks, then do the same on the opposite side of that layer. That way you have built in breather holes. Then you can lay down the 4th layer per normal with the bricks touching all the way around.
You can choose to use construction caulk if you feel the need to have your bricks or pavers secured to each other. I don’t feel this is normally necessary, so I am choosing to also skip that part.

At this point, my fire pit is completed. I’ll grab some newspaper, some wood, and some whiskey! You can bring over the smores and grape soda! Let’s do this!!!
If you are continuing on to do the surrounding area around your firepit, I wish you the best! Please continue to step 7!
Step #7:
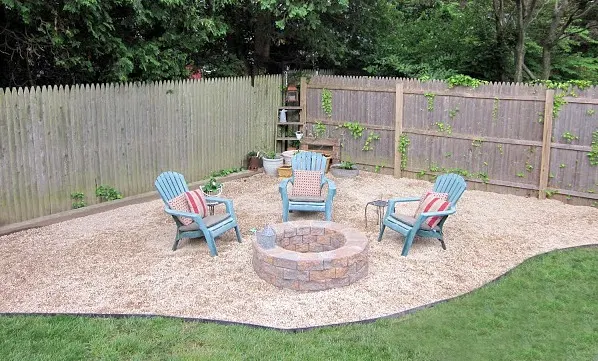
For your patio area around the fire pit, you can use some weed killer if you want to go over the grassy area within the boundary of your border rail (or spray painted) outline. If you opted to remove all the grass in this area, congratulations you are officially a harder laborer than I am. 😊 Now, get your black weed tarp/weed barrier, and start laying it down in the entire area that will be your patio. You can usually cut this easily with good scissors or a Utility knife. Once you have all the tarp/week barrier laid down, you can spike it in place with weed barrier spikes or some sort of landscape staples such as the ones here LAWNSTAPLES. They are super cheap and usually run about $12 for 100 of them.
Step #8:
Now you have to decide on what kind of fill to use for your patio area. There are numerous different choices out there, and it depends on what you are looking to achieve in terms of look. A lot of people use pea gravel because it is smaller and easy to traverse. I’ve even seen some people use pea gravel first, then place paver flagstones on top of that. (1.5 inch of pea gravel)
Some people use river rock because it is easy to have delivered. River Rock is okay, but it does make it a little more difficult to walk on. I’d say if you are looking to ease accessibility, then pea gravel may be the way to go.
Preppy Pro-Tip: try to place your patio in an area that will make it easy for the Pea gravel delivery man to back his truck up and pour the gravel out right in the area of your patio. It will make much less work using a wheel barrow to haul it from the front of the house, to the back. (lazy rules the day)
Start spreading out your pea gravel evenly. Try to get it as level and flat as possible, especially if you are planning flagstones on top of it. Nothing is worse than seeing wonky flagstones, at all manner of angles and looking all bad. Afterall, you don’t want your neighbors thinking you are an amateur at this do you?
Take some time leveling out the pea gravel. It will be worth it. Use a rake and get it moved into place. You can then use a 2x4 to lay on the ground and start using it as a scraper, to level things out even more. You can also place a carpenter’s level on the 2x4 at any place you feel isn’t quite level, and fix what is needed to
make it “Bubble Perfect”.

If you are doing flagstones, lay them out in some pattern that makes sense or makes you happy. If you plan to cover the entire area marked out, get to it and don’t drop them on your toes. That’s a lot of flagstones, but man will it look nice! Use a rubber mallet to hammer them down GENTLY so they nestle in the pea gravel nicely!
Final Step: Pull out the lawn chairs and enjoy your evening!

End Project Gr11/2024 Pictures sourced from: https://www.homeroad.net/2011/06/building-firepit.html
